How to post
By Vipul Chodankar
1 min read · 2020-06-15
How to get started with blog posts
We'll follow the following structure to ensure things stay organized.
How to save the post
- Fork the repo
-
Clone the forked repo
git clone https://github.com/<YourUserName>/new-webapp -
Create a new branch (folder-name explained in the folder structure)
git checkout -b blog-folder-name -
Add your files
Example
git add .to add everything -
Commit your changes with a meaning message
git commit -m "Blog: folder-name" -
Push your changes to your forked repo
git push -u origin blog-folder-name - Create Pull Request on GitHub and add label 'blog'
Folder Structure

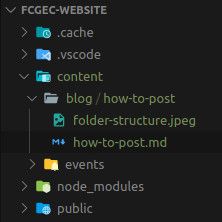
- Create a folder inside content/blog
- Use kebab case to name the folder, the same name will be used for your file. For example, in the above picture, I name my file and folder as 'how-to-post'.
- Create a markdown file with the same name as your folder.
-
Add any images that you will require to the folder or directly use their links.
Supported image types: PNG & JPEG
Learning Markdown
It's quite simple once you get the hang of it.
Where do i see my post?
Your post will be visible at https://fcgec.netlify.app/blog/file-name
Example: this post is at https://fcgec.netlify.app/blog/how-to-post
